


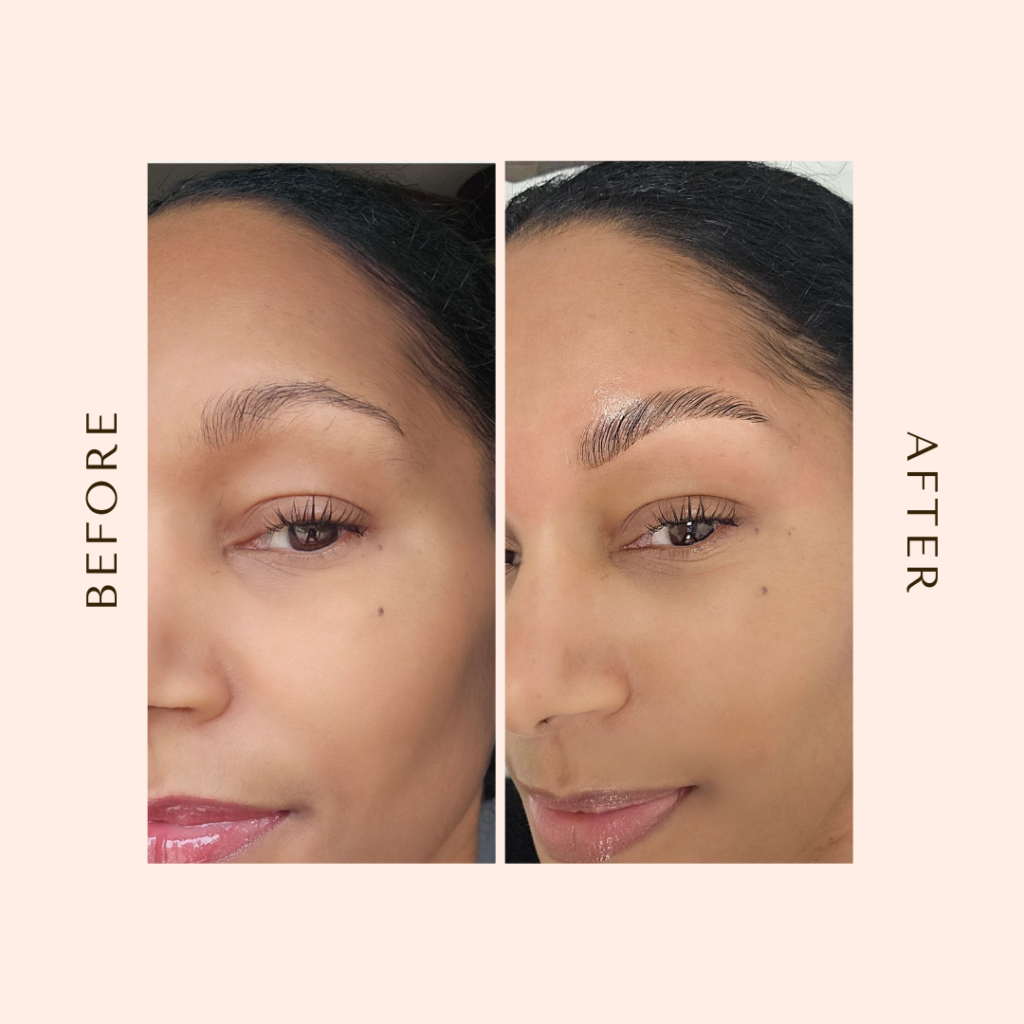
Once upon a time, my brows were so wild they could’ve hosted their own safari. I’m talking brow goals for days. My brows could have given Frida Kahlo a run for her money. But then, tragedy struck and the tale of my brows quickly turned into a brow soap opera with way too much drama. Years of plucking and tweezing in an effort to get that perfect arch made my brows stage a protest and go on hiatus. The hairs refused to grow back no matter what I did — resurrection was not happening. Just as I was about to lose all hope, I learned about brow lamination. Could this be the brow glow-up that I was desperately looking for?
What is Brow Lamination?

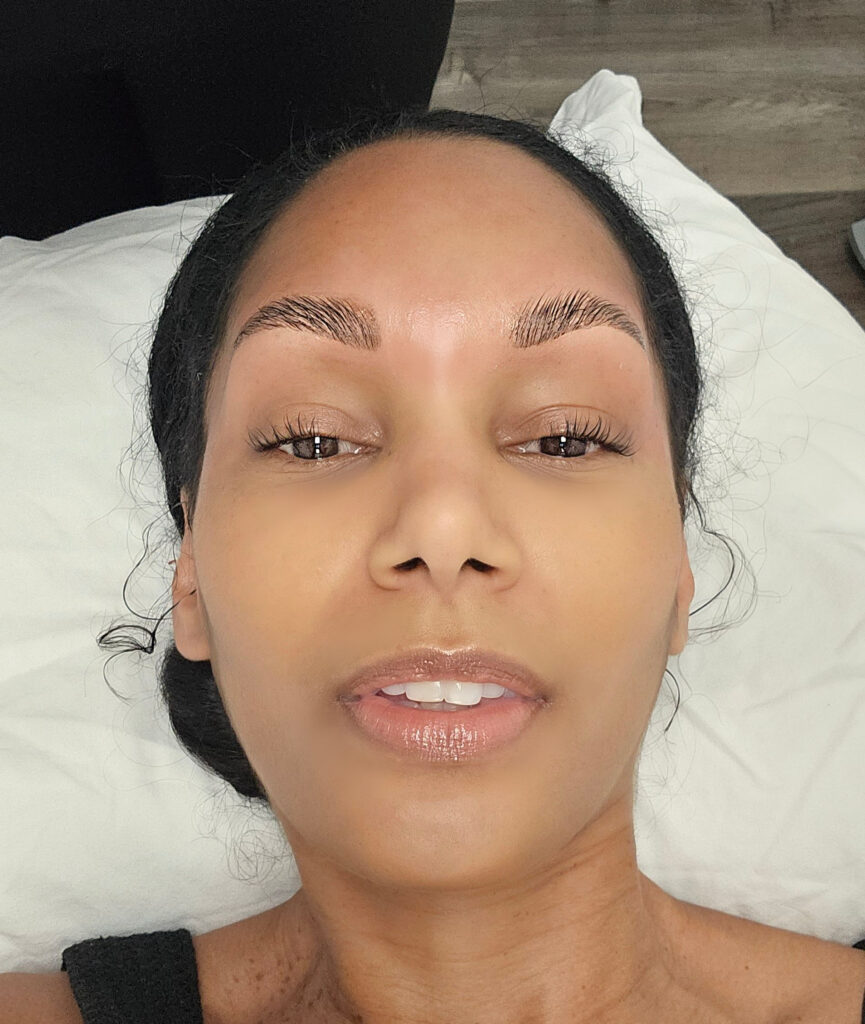
You may have seen it all over social media. Brows that are perfectly groomed, stand up straight and have a soft glow to them. Nope, it’s not natural — it’s brow lamination. This non-invasive cosmetic procedure is designed to take charge of your eyebrows, giving them a groomed and lifted appearance. The process begins with the application of a chemical solution, softening the hair structure and making it more flexible. After this, the brow hairs are meticulously brushed into the desired shape and secured in place with a gentle adhesive. This technique helps your brows appear fuller and more defined.
The benefits of brow lamination
For me the one of the major benefits of brow lamination is just how easy it makes it to groom your brows on a daily basis. When doing my makeup, I spent the most time trying to fill in and make my unruly brows look somewhat groomed. After brow lamination, those days were over. Imagine waking up, giving your brows a quick brush, and you’re good to go – no makeup necessary. Another benefit is that during the brow lamination process, the beautician can reshape your brows and brush them in a direction that’s more aesthetically pleasing. Whether you want a prominent arch, a straighter brow, or a shorter tail, the beautician can manipulate the hairs to try to achieve this. Best of all, brow lamination can last approximately six weeks.
What About eyebrow threading and Waxing?
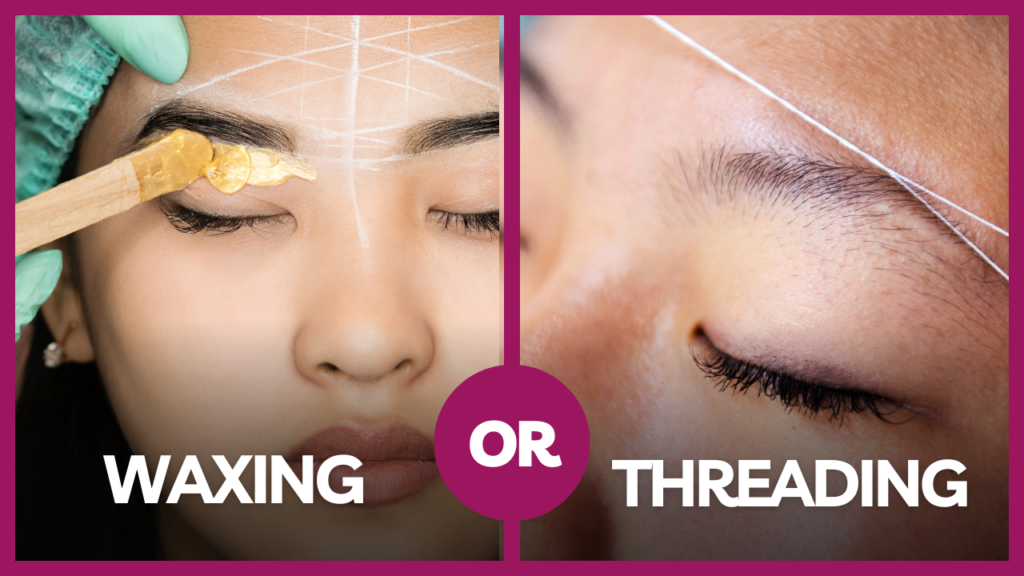
When it comes to brow grooming, I’m not a stranger. As you may be able to tell, I have a lot of hair. I initially started going to salons to have my bushy brows cleaned and waxed into submission. To maintain the look, I’d consistently tweeze the hairs that would grow back. Heck, tweezing was my new cardio. Once threading became all the rage, I started dabbling in that. I was a regular at the local brow threading salon where they would use yarn to pull out the excess and stray hairs.
Want to learn about Eyebrow Threading? Watch my YouTube video about it.
You may be wondering, “Is eyebrow threading better than eyebrow waxing?” I must say that although threading doesn’t require any chemicals, it’s not as precise as waxing. I found that with brow threading, often the entire hair just gets yanked out. With waxing, the beautician can be a lot more precise. I should also say, I’m talking about waxing in a beauty salon, not in a nail salon that suddenly decided to double as a beauty salon.
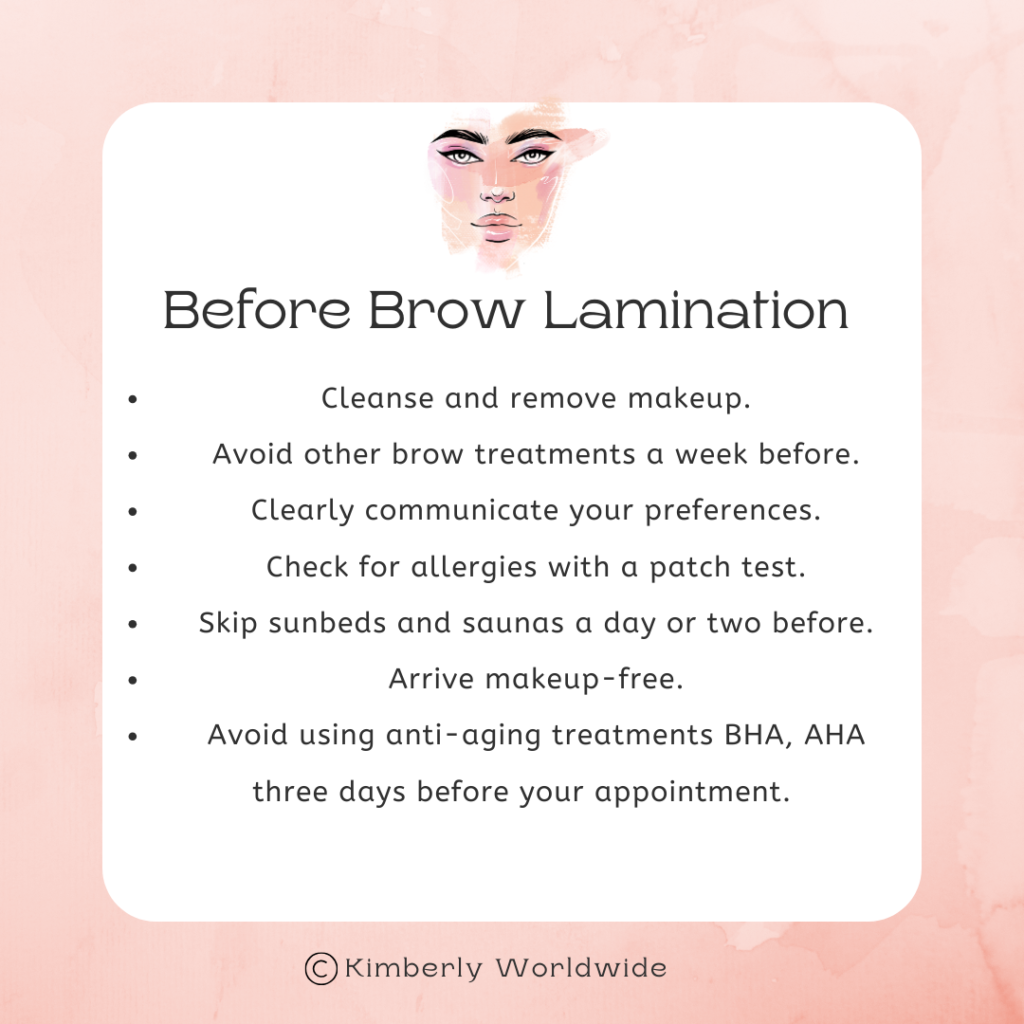
How to Prepare for Brow Lamination
Properly prepping, and knowing what to do and what not to do, before your brow lamination appointment is essential. Of course you want to research the salon of your choice to make sure you’re in good hands. Read their customer reviews and look at before and after photos. Once you’re ready to make your appointment, stick to the before steps below:
step by step brow lamination
Step 1: Cleansing the Brows
Before starting the process, the beautician will cleanse your brows to make sure they are free of any makeup and oils. In my case, my brow area was shampooed and dried.
Step 2: Lifting the Brows
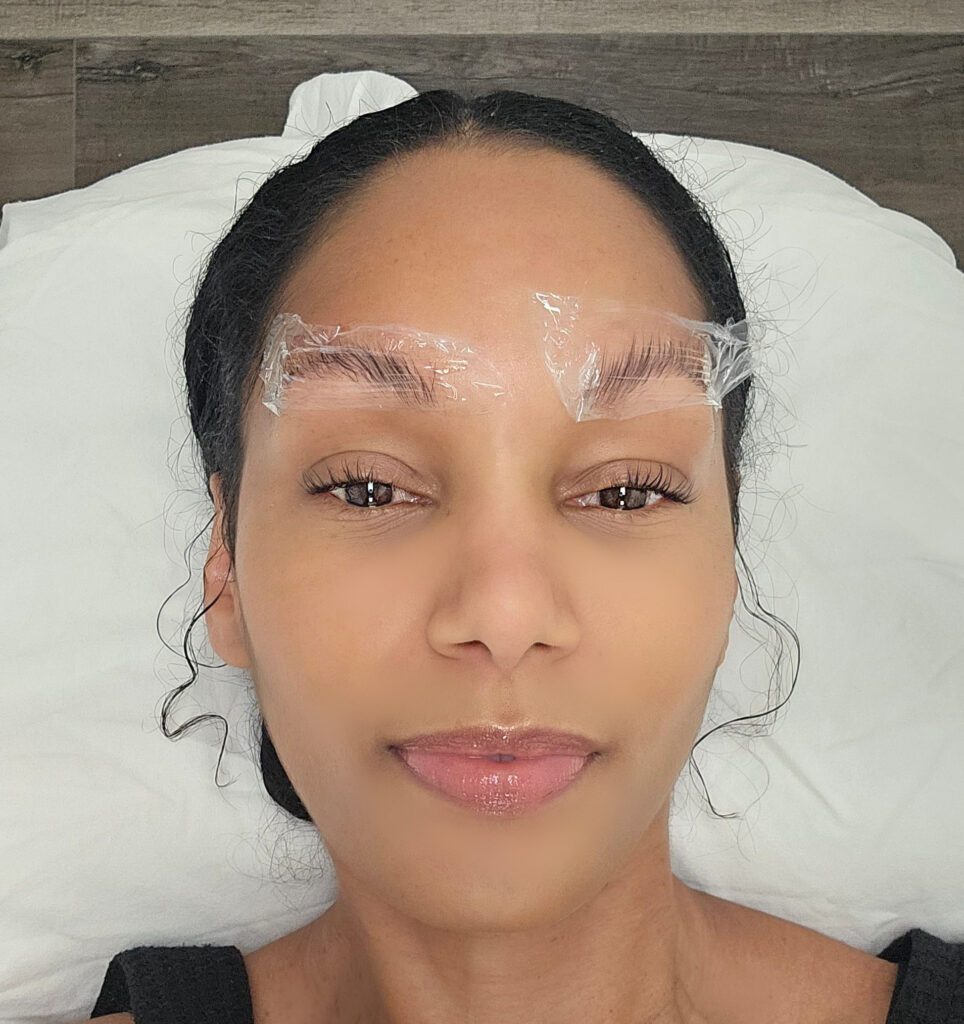
A lifting cream is applied to the brows. This cream contains chemicals that soften the hairs so that they are easily reshaped. The cream breaks the so-called bonds of the hairs, which makes it so they can be lifted and placed in that much desired upright position. The beautician will cover the cream-covered brows with cling film for enhanced processing. The lifting cream stays on for about 5 minutes before it gets removed from the brows. (depending on your hair type, it may be a bit longer or shorter).
Step 3: Neutralizing the Brows
Next, is the neutralizing step, which will restabilize the hair structure after it was broke down. It also stops any chemical over processing from lifting cream residue that wasn’t removed. This step is essential because it minimizes damage to the brow hairs and stabilizes them after the lifting process.
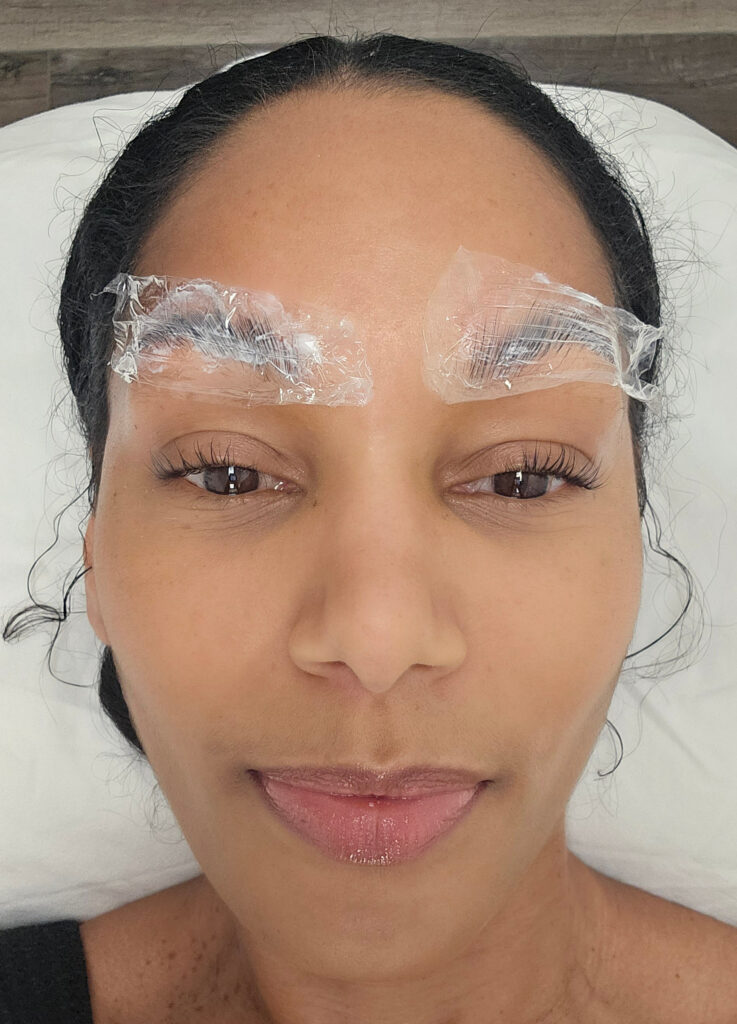
After applying the neutralizing solution to the brows, they are again covered with cling film for about 5 minutes.
Need a brow makeup solution? Check out this blog about the Arches & Halos Microblading Brow Pen.
Step 4: Cleanse and Tint the Brows

After the neutralizing solution is removed, the beautician can tint your brows. This step is optional. You may wonder, “What is brow tinting?” It’s similar to dyeing your hair, only now you’re dyeing your eyebrow hairs. I didn’t think it would make a difference, because my hair is already black. However, after seeing the result of the tint, I will always include this step in the lamination process. The brow tint only lasts about 5 days and gradually fades as you wash your face.
Step 5: Nourish the Brows
A nourishing lotion is applied to the brows. It moisturizes and conditions them, similar to the effect of a hair conditioner or nourishing oil.
Step 6: Style and Groom the Brows
During this final step the brow hairs are brushed into their final position. Stray hairs are tweezed or waxed, and long hairs can be trimmed.
Aftercare for Laminated Brows
After the procedure, you will get instructions on how to care for and maintain your brows. Below are some of the instructions you can expect to get.

How much does brow lamination cost?
The cost of brow lamination really depends on the salon you go to. When looking for a salon, I came across various prices, but generally they all ranged from $85 – $150. This is without any additional services, such as the brow tint. Tinting is generally quite affordable, because the results only lasts a few days. Count on paying anywhere from $15 – $25 for a brow tint.
I hope you found this blog informational and that it answered any questions you may have had about brow lamination. I’ve only had my brows laminated for several weeks now, so this blog doesn’t contain any cons yet since I haven’t encountered any so far. I will update the blog if I experience any not so pleasant side effects of brow lamination. Meanwhile, how do you care for your brows? Sound off below.


That is so beautiful and I love the way the eyebrow was shaped
Thank you. So glad to hear you like the results.
This blog post is a journey from wild brows to the quest for the perfect arch. Who hasn’t faced the tragedy of over-plucking and the hairs going on strike? But fear not, the plot thickens with the discovery of brow lamination – the potential brow glow-up we’ve all been waiting for!
Your brows look absolutely amazing! I need to try this for myself.
Love how this looks! I had not heard of this before, and I had no idea how the process worked. Nice to know this is an option.
It’s quick, easy and non-invasive. I wish I had discovered this earlier.
Sounds like your brows have been through a lot, but brow lamination sounds like it might be a winner for you.
I’ve been considering brow lamination, and your detailed experience has convinced me to give it a go.
One warning… when you see the results, you’ll instantly be hooked LOL. I was
I love how your brow looks after the brow lamination process and it is great that it is a non-invasive procedure as well
I really like how the eyebrow turns into something new. This is beautiful, I really like it!
Thanks Nikki. Glad you like the brow lamination. I do too so much.
Wow, big difference the before and after, this would be great for my friend as we were talking about it as well.